Watch this video to get a good idea
of how to make the basic paper box...
then check out my photos below for
further instructions on how to make it better!
further instructions on how to make it better!
Notice how these boxes have the
half-lid? Follow the instructions below to learn how!

First of all, fold and cut the paper as if you were
making a regular box.
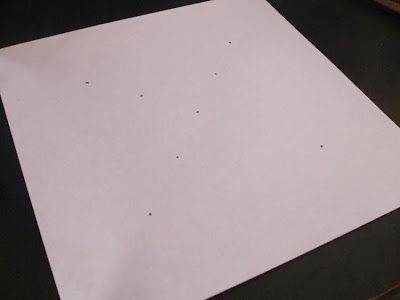
Notice that I've placed dots in four places
around the middle squares that will form the base of the lid.

...and this...

After making the folds on all sides, remove a triangular
piece from each side of the larger triangular sides.
Notice the half-fold along all the sides of what
will be the base of the lid.
Your paper should now look like this:
piece from each side of the larger triangular sides.
Notice the half-fold along all the sides of what
will be the base of the lid.
Your paper should now look like this:

Then, begin forming the sides as you would
for a regular box, except notice that the sides are shorter and
the points will end up all the way over to the other side of the lid
instead of in the middle as for the base.
for a regular box, except notice that the sides are shorter and
the points will end up all the way over to the other side of the lid
instead of in the middle as for the base.

Continue forming the sides...

Here is the finished lid...

You can even put two lids together to
make a very flat box!
Notice how the top of this lid has no center creases?
Read on to learn how!
make a very flat box!
Notice how the top of this lid has no center creases?
Read on to learn how!

Here's how to make the crease-less boxes and lids.
I will use a lid as an example...
First of all, fold a paper just as if you were going to make
a box. Then, perforate the paper in the spots where you
would place the corners of the paper for each fold.
Place this paper over the square that you will use
for the lid (you would have just five holes for the base).
With a pencil, make a mark on the paper underneath
where each hole is.

When you remove the pattern piece, your
paper will look like this:
paper will look like this:

Pick a corner and fold it over to the center dot, like this...

Repeat on all four sides (sorry, blurry, I know...)

Then, begin making the rest of the folds using
the other dots as a guide...
the other dots as a guide...

Notice the paper does not have the two diagonal center folds.

Make the final folds and cuts...

These boxes can be made in any size
and for any occasion!
Here is a cute Christmas box...
it would look quite dazzling with a ribbon tied around it!
and for any occasion!
Here is a cute Christmas box...
it would look quite dazzling with a ribbon tied around it!

Here's a box made from pages from a magazine
with stiff pages...
with stiff pages...

It looks good with or without the lid!

Here are a couple of cuties that are about
an inch square! This size would look
really nice with a ribbon or bow and placed
on a Christmas tree, a Christmas mobile,
or used for really small gifts...
an inch square! This size would look
really nice with a ribbon or bow and placed
on a Christmas tree, a Christmas mobile,
or used for really small gifts...

If you want to make the boxes without the creases
in the lids, you will need to make a pattern for
each size of box. Here are the 1" boxes
with their patterns. The 1" boxes are made with
papers that are 3" by 3" in size.
Always remember to make the base a bit
smaller than the lid!
in the lids, you will need to make a pattern for
each size of box. Here are the 1" boxes
with their patterns. The 1" boxes are made with
papers that are 3" by 3" in size.
Always remember to make the base a bit
smaller than the lid!

Now that my creative juices are flowing, I'm thinking about other materials that could be used to make boxes! I think that pages out of old books, especially colorful children's books, would look really cute! Especially with matching ribbons. And how about newspaper/comic page boxes covered with glue decoupage-style to make them stronger? Or even lightly spray painted? The sky is the limit! Be sure to post pictures if you make any boxes! We'd love to see them!
And please, let me know if you have any questions...this is a super long post and was a bit complicated to put together (I know, a video would have been easier, but it runs down the batteries on my camera...).


2 comments:
These are great, how nice to have the scrapbook paper and what a good idea. I'm sure the card stock weight would be nice and durable.
Yes, Mo, the cardstock is a nice weight for these boxes, the scrapbook paper was a little light, but worked well for the lids! The ladies here love these boxes, I keep getting more requests to show how to make them! :)
Post a Comment